If you like the Montessori or Waldorf methods for raising your little one, your house is probably full of wood already. Wooden toys and furniture are a staple characteristic of this simple yet very mindful approaches.
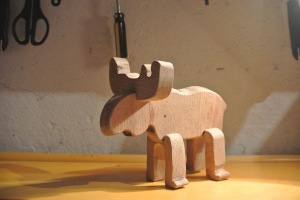
To take a step further, you can make a wooden toy yourself. Pick your favorite totem animal and go for it, it won’t take more than one evening to finish. I made a moose – their antlers are so eloquent and I feel deeply connected to them as some of my ancestors come from the Scandinavian lands.
- a piece of solid wood or plywood, 3/4 to 1 inch thick
- pencil
- clamps
- jigsaw
- sandpaper
- drill & screws (or white glue)
- wood wax (optional)
As soon as you get everything ready, it will only take about an hour and a half.
Step 1. Draw
Sketch out the parts of your animal. There will be three pieces: body, legs and antlers/ears. You can even skip the latter for some animals – say, fox. But it will add a nice detail and dimension, so I recommend making them.
Add the interlocks on each detail – it’s the notches that will later intersect to keep all elements secured together.
Step 2. Cut
Pick a piece of solid wood or plywood. Make sure it’s thin enough for your jigsaw to cut through (up to 1 inch would usually do). Trace the elements onto wood. Make sure you trace the legs part twice. To make cutting easier, trace them close to the edge of the board.
Make sure you have a good sharp blade installed in your jigsaw. It will save you a lot of effort and make cuts much prettier. Trust me, I learned this lesson the hard way.
A good advice is to google “how to cut curves” BEFORE you cut them. Here, let me save your time with this perfect tutorial. Two words, guys: relief cuts.
Terrible, huh? Well, practice makes perfect.
This moose was very far from perfection, as you can see. But I’m still sharing it. Be confident. You’ll need to push through lots of imperfect projects to get good at woodworking. So don’t give up. Your baby will love it no less, and you will be even more proud showcasing your path to success.
Step 3. Sand
Sand each element very well. After all, it’s your kid who’s gonna play with it, right? A good decision is to use several pieces of sandpaper, finishing off with as fine as 400 grit. You may skip the interlock notches as they will be hidden.
Step 4. Assemble
Connect all the elements with the interlock notches. Then screw it together. Drill the toy through beforehand, so the screw doesn’t splint your elements. When the wooden pieces are not too thick, that happens all the time.
Drill twice: first with a 1 mm drill bit for the screw going deep and then with 4-5 mm drill just deep enough to get screw head dipped into the wood. Now get your animal screwed together.
If you’re uncomfortable with drilling, just glue it all together with white glue. Works just as good, and if the toy breaks down, there will be no nasty sharp parts sticking out. Just put the clamps on it and let sit for about a day to make sure it sticks together well.
Ta-daaaa!
Note the leg – this moose looks like he is dancing just a little bit! Yay to imperfections!
What a lovely wooden toy you’ve just made! Wax it up for a smooth glowing finish. Or don’t.
A perfect addition to your Montessori nursery and to your baby’s fun time.





 No products in the cart.
Comments (1)
Comments are closed.